Xcode Previews are great. To be able to immediately see how changes in your code are rendered immensely speeds up the development process and makes developing UI elements real fun.
What makes previews even better is that they automatically become interactive when your View has a @State. Consider this code:
struct ColorSwitcher: View {
    @State var color: Color

    var body: some View {
        VStack {
            HStack {
                Button("Red") { color = .red }
                Button("Green") { color = .green }
                Button("Blue") { color = .blue }
            }
            color.frame(width: 200, height: 200)
        }
    }
}

#Preview {
    ColorSwitcher(color: .red)
}
With automatically gives you a preview that is interactive. When you click on the buttons you can see that the colors change:
So far, so easy.
Things become a bit more complicated when your view uses a @Binding instead of a @State. This is really common when you implement custom UI controls:
struct ColorSwitcher: View {
    @Binding var color: Color

    var body: some View {
        VStack {
            HStack {
                Button("Red") { color = .red }
                Button("Green") { color = .green }
                Button("Blue") { color = .blue }
            }
            color.frame(width: 200, height: 200)
        }
    }
}

#Preview {
    ColorSwitcher(color: .constant(.red))
}
Now you need to instantiate a Binding inside the #Preview. The only way to do this without having access to a @State is to use a constant binding. This works but now the interactivity is gone. You can still tap the buttons, but the colors do not change (because the binding is a constant binding that cannot change).
Previously (before iOS17) you help yourself by adding a preview wrapper that can have a @State:
struct ColorSwitcherPreviewWrapper: View {
    @State var color: Color = .red
    var body: some View {
        ColorSwitcher(color: $color)
    }
}

#Preview {
    ColorSwitcherPreviewWrapper()
}
This works, but it not a very elegant solution.
iOS17 to the rescue!
Now we can use the new @Previewable tag to allow a dynamic property to appear inline in a preview.
#Preview {
    @Previewable @State var color = Color.red
    ColorSwitcher(color: $color)
}
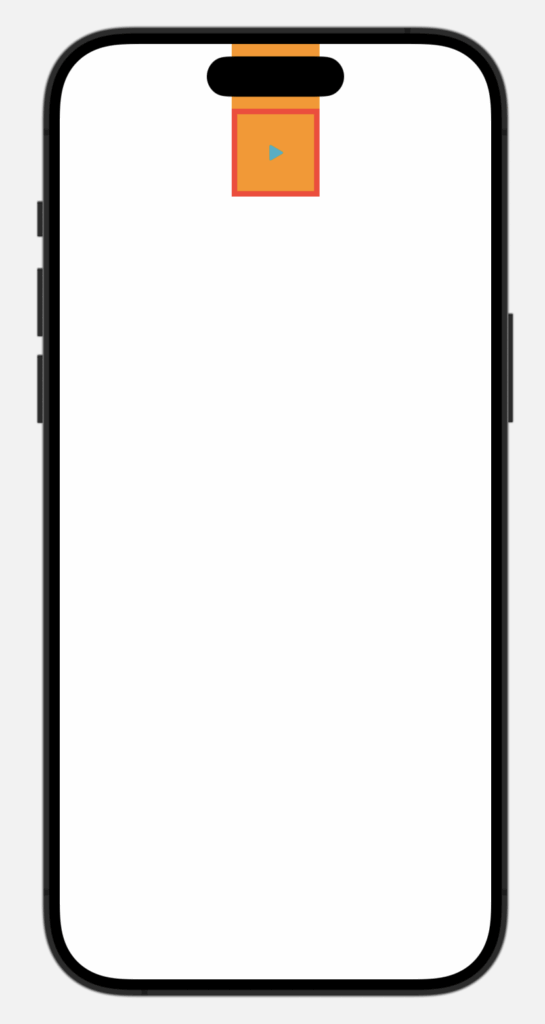
Recently I was confronted with a strange behaviour of a Button in SwiftUI. The button was placed directly at the top of a view that was at the border to the top of the screen near the status bar. Somehow the button’s background color was stretched all the way to the top. In other words: the buttons background color was underneath the status bar, but the button was not.
As you can see, the background color is stretched to the top under the status bar and magic island. Strangely the border is not.
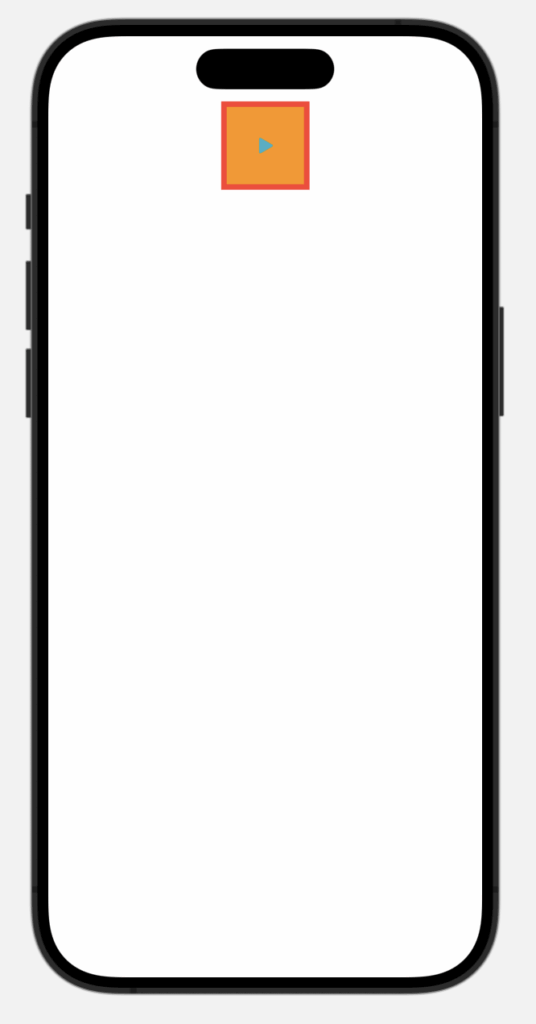
There are use cases where this behaviour is wanted (like extending the background color of a view into the safe area). But for this button it is definitely not wanted. The fix to this is really easy. The .background modifier has a second parameter ignoresSafeAreaEdges that takes a Edge.Set value. The default value for this parameter is .all which extends the background into all safe areas. If you pass an empty Set you can stop the bleeding 😉
You have to draw an arc or a semicircle in SwiftUI. The most obvious way to do that is to use a Path. In this blog post you can see how to do that, but it is really not rocket science.
Turns out there is an even quicker and easier way to draw a fraction of a circle. SwiftUI’s Shapes have a method called trim(from:to:) that allows you the specify what fraction of a Shape’s path you want to draw. If you want to draw a semi circle you could call that method like this:
As you can see the path of a Circle shape starts at the right center (or 03:00 hours on a clock). Because the value that you pass as from parameter has to be smaller than the value for the to parameter, you cannot draw a semicircle from top to bottom like this because that would mean that you would have to set from to 0.75 and to to 0.25. That is not allowed.
With a little trick you can still achieve that. You simply draw a semicircle from 0.0 to 0.5 and then rotate the shape by -90 degrees. IMHO still simpler that using a Path for this.
You can use this trim method on all SwiftUI’s built-in Shapes. For example if you want to draw a right triangle with SwiftUI you can do this:
Rectangle()
    .trim(from: 0.0, to: 0.5)
    .fill(Color("pdMagenta"))
    .frame(width: 120, height: 80)
Of course you could easily draw a Path for this, but I think the trim method is a pretty cool tool that you can use for drawing semicircles, quarter-circles or triangles.
Now we need to let SwiftUI know what kind of arc we want to draw. As a human I would describe the arc as starting at 90 degrees and ending at 180 degrees, because we are usually assuming that 0 degrees is at the top of a circle.
SwiftUI begs to differ. In SwiftUI 0 degrees means straight to the right. In other words:
Human 90 degrees == SwiftUI 0 degrees
Because of that we need to draw and arc from 0 degrees to 90 degrees. (I add a gray background, so we can see the frame of the arc)
Seems pretty straightforward, but the result is a not what I would expect:
This is where things get wild. According to Apple’s docs SwiftUI (and UIKit) use a flipped coordinate system.
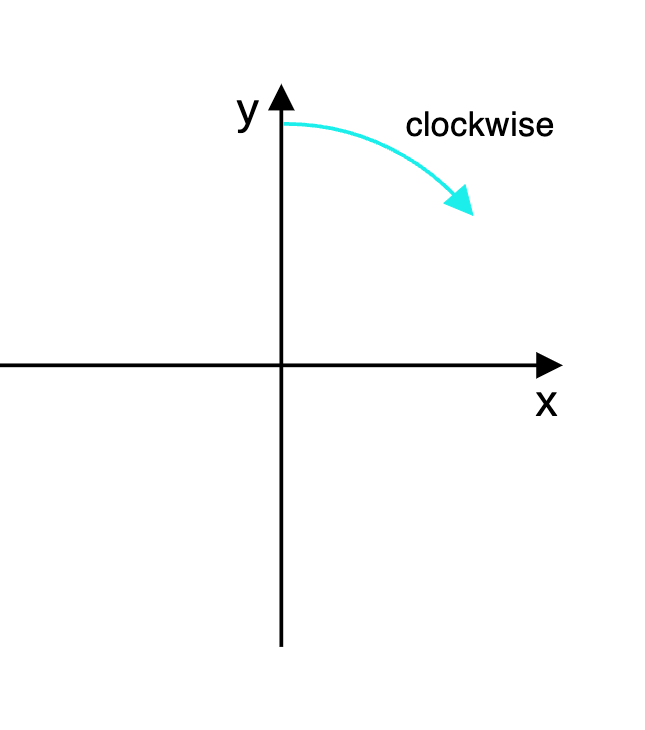
To explain what that means let’s have look at these two illustrations:
In a Cartesian coordinate system (that we humans are used to) increasing values on the Y-axis go up to the top. Resulting in the “clockwise” that we are used to.
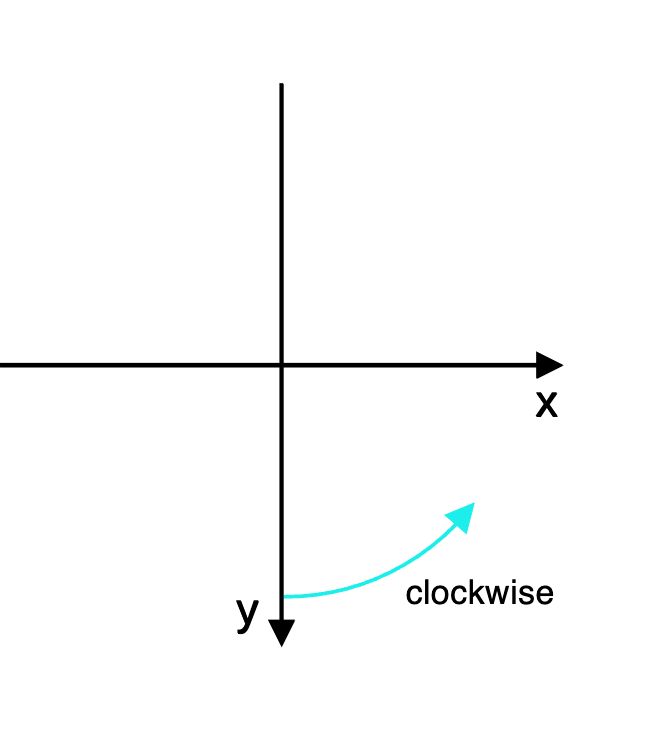
In SwiftUI’s flipped coordinate system increasing values on the Y-axis are going down to the bottom of the canvas. And that results in a reversed “clockwise” direction. IMHO that is really counterintuitive, but that’s the way it is 🤷♂️ This is an excerpt from the Apple docs: “In a flipped coordinate system … specifying a clockwise arc results in a counterclockwise arc”
In other words: Clocks run backwards in a SwiftUI context.
To get the arc we want we have to toggle the clockwise parameter in our custom ArcShape:
Recently I had to fix a bug where a DateFormatter would return nil when trying to convert a String to a Date. The date string was in a perfectly valid format and the formatter would return nil while on two dates when all the other dates could be transformed without problem.
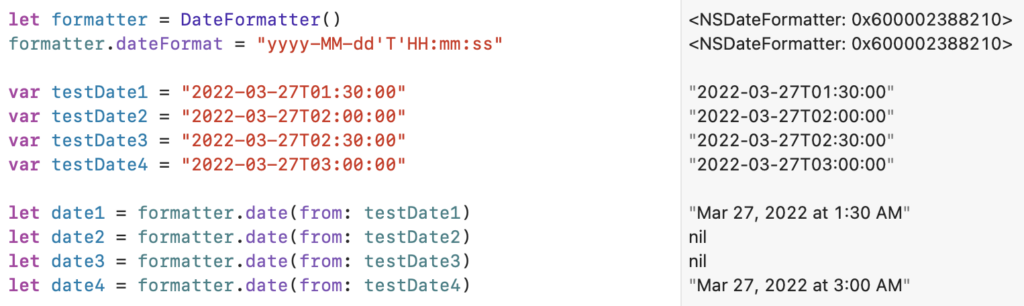
Here is a screenshot of a playground that I used to examine the problem:
As you can see the formatter does not have a problem with 2022-03-27T01:30:00 but for some reason it cannot transform 2022-03-27T02:00:00 to a valid date
I observed that this invalid dates only occur on March 27th between 02:00a.m. and 02:59a.m.
And then it dawned on me. Daylight Saving Time! Of course. In my country we change our clocks on March 27th directly from 01:59 to 03:00. So the formatter is correctly returning nil when trying to format a date that lies in the hour that does not exist during that night.
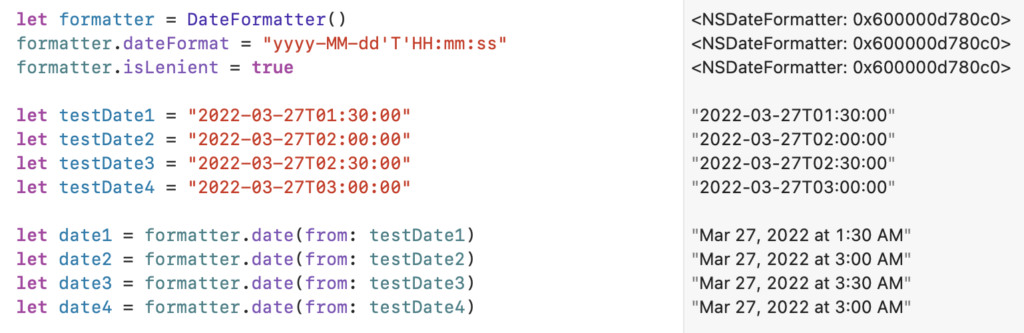
So a DateFormatter is quite clever and knows about the oddities of DST. Turns out, that DateFormatter is even more clever when you want it to be: By setting its isLenient property to true the formatter uses heuristics to guess what date you wanted when you provides the date string for a date that does not exist.
Here is what happens when you let the DateFormatter guess what you really wanted:
As you can see now the formatter correctly transforms the 02:00a.m. date to 03:00.a.m. during the night of the switch to Daylight Saving Time.
This might not always be what you want, but in my case it was the (easy) fix to the bug.
My new year started with a really strange bug. I use a DateFormatter to show the current month to the user. So when I opened the app on January 02, 2021 I expected to see “Saturday, Jan 2, 2021”. But what I got was “Saturday, Jan 2, 2020”. Somehow my DateFormatter did not get the message that 2020 was finally over.
let isoDateFormatter = ISO8601DateFormatter()
let january2 = isoDateFormatter.date(from:"2021-01-02T12:00:00+0000")!

let fmt = DateFormatter()
fmt.dateFormat = "EEEE, MMM d, YYYY"
fmt.locale = Locale(identifier: "en_GB")
fmt.string(from: january2) // gives you "Saturday, Jan 2, 2020"
So what happened? It took me quite a while to get my head around this bug. We all know that timezones can be tricky, but my DateFormatter did get the weekday, day and month correctly but the year was wrong. So it was not a matter of timezone confusion.
After fiddeling around a bit I replaced “YYYY” with “yyyy” and the bug was fixed.
fmt.dateFormat = "EEEE, MMM d, yyyy"
fmt2.string(from: january2) // gives you "Saturday, Jan 2, 2021"
But why? Turns out that “YYYY” uses a week-based calendar for its calculations.
So what is a week-based calendar???
A week-based calendar uses calendar weeks for its calculations. The concept of a calendar week is pretty straight forward. A year usually has 52 weeks so you can identify any week in a year by its number (e.g. week 17 is usually the last week in April).
But when does the first calendar week start? January 1st? That would be easy. Unfortunately it is more complicated than that. I found this definition:
In Europe, the first calendar week of the year is the first week that contains four days of the new year.
For 2021 this means that the first calendar week starts on Monday, Jan 4, because the first 3 days in January are in the previous week. And that week only contains 3 days of the new year and is therefor considered the last calendar week of 2020.
So, in a week-based calendar the first three days of 2021 are still part of 2020. Crazy.
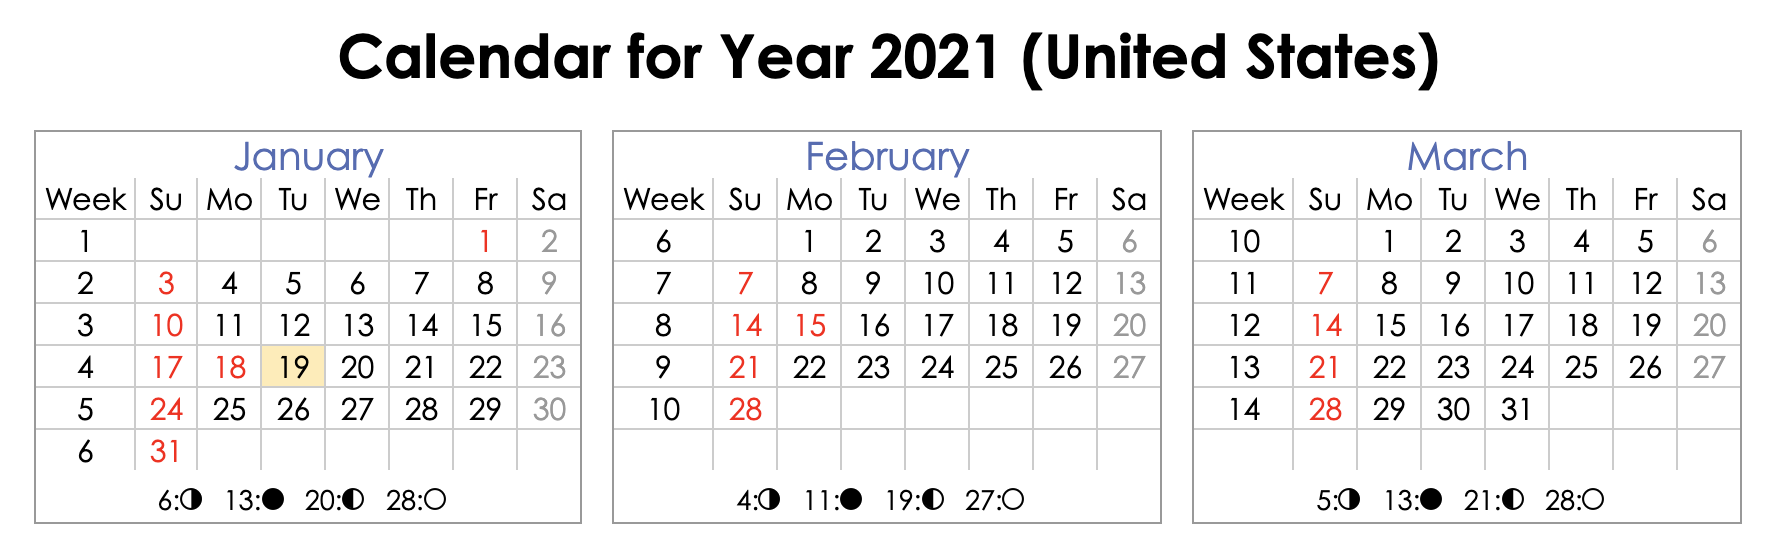
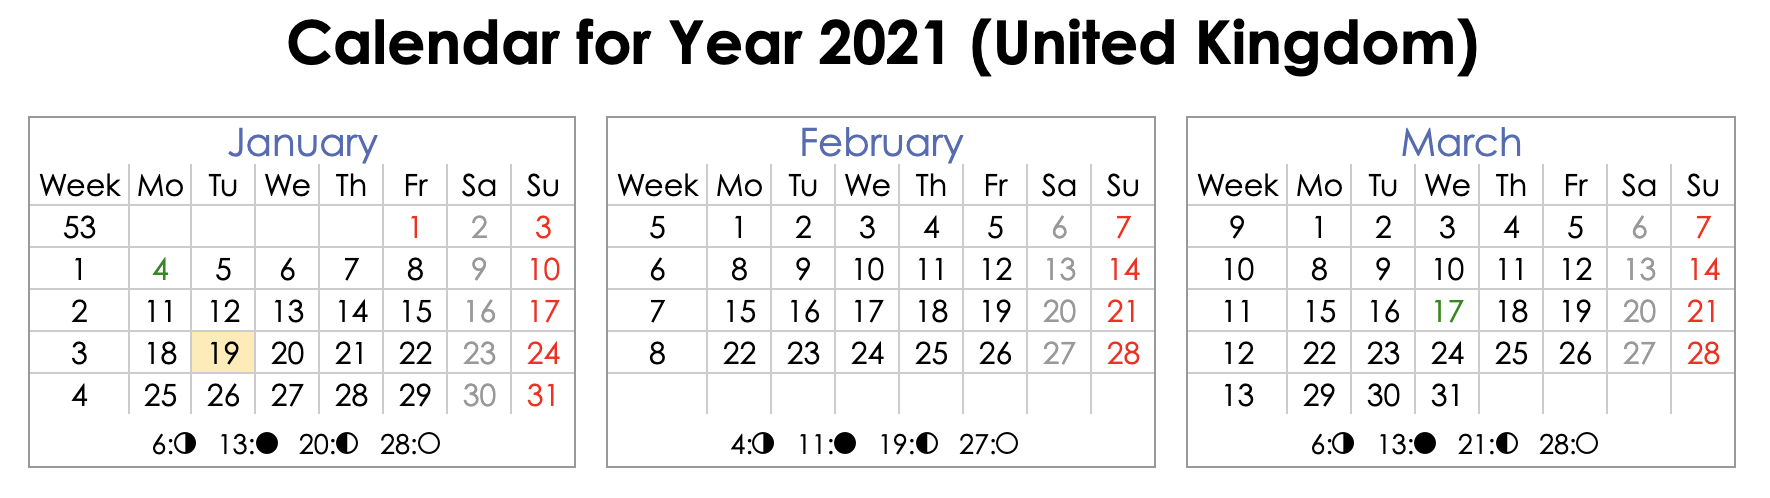
But that’s not the end of the craziness. You might have wondered about the “In Europe” part of the definition”. The thing is: In Europe the first day of a week is Monday. In other countries (like the US and Canada) it is Sunday and in the Middle East it is Saturday. To add even more confusion: Some countries (like the US and Canada) choose to make things easier and start the first calendar week on January 1, no matter which day of the week this happens to be.
Here is a comparison between calendars in the USA and the UK (have a look at the week numbers and the first day of the week):
So the same day can be in different calendar weeks, depending on your locale:
let fmtGB = DateFormatter()
fmtGB.dateFormat = "YYYY-ww-D"
fmtGB.locale = Locale(identifier: "en_GB")

let fmtUS = DateFormatter()
fmtUS.dateFormat = "YYYY-ww-D"
fmtUS.locale = Locale(identifier: "en_US")

fmtGB.string(from: january2) // gives you "2020-53-2" (day 2 in week 53 of 2020)
fmtUS.string(from: january2) // gives you "2021-01-2" (day 2 in week 1 of 2021)
So in the future I will be really careful NOT to use “YYYY” in a DateFormatter. The worst thing about this bug is that it only occurs in the first days of a new year (or the last days of the old year). The rest of the year everything is working well. Quite a sneaky bug that is 😉
Some things are inexplicably hard in iOS. Like changing the color of your app’s status bar. In theory it is really easy:
Set UIViewControllerBasedStatusBarAppearance to true in your Info.plist
Override preferredStatusBarStyle in your view controllers to return your desired UIStatusBarStyle
So why doesn’t it work in some cases? Chances are that you are trying to set the status bar style in a view controller that is embedded in a UINavigationController. In that case the system is asking the UINavigationController for its preferredStatusBarStyle. The override in your custom view controller is simply ignored.
To fix this you can use this handy little extension on UINavigationController:
extension UINavigationController {
    override open var preferredStatusBarStyle: UIStatusBarStyle {
        return topViewController?.preferredStatusBarStyle ?? .default
    }
}
Now the UINavigationController gets the preferredStatusBarStyle from its topViewController (your custom view controller). Or it does return the default value if there is no topViewController (which should never happen)
From time to time it happens to all of us: An app crashes with the not really helpful message “terminating with uncaught exception of type NSException”. Great.
This can happen when an assertion in a framework you are using fails (among other reasons). When this happens Xcode is not very helpful and just shows you that an exception was thrown. It does not show the reason nor the location where the exception was thrown.
Not very helpful.
To find our more about the exception you can use an Exception Breakpoint:
1. Open the breakpoint navigator (⌘8)
2. Press “+” in the footer
3. Choose “Exception Breakpoint…”
4. Leave all default values. Only change “Action” to “Debugger Command”
5. Enter po $arg1 into the text field
That’s it! Your shiny new Exception Breakpoint should look like this:
Now, when you try to start your app again, it still crashes (obviously), but you’ll see the exception’s message in the Debug area and Xcode shows you the code where the exception was thrown:
I currently work on a project where we use Apple’s User Notifications (formerly known as Push Notifications) to deliver chat messages to our users. Whenever the user is not in the chat screen we want to show the Notification using the standard system banner on top of the screen.
Per default when a User Notification is received while the app runs in the foreground the notification is not shown to the user. With the arrival of Apple’s iOS10 UserNotifications framework you can easily decide whether to show the received Notification or not. When a Notification is delivered to a foreground app the UNUserNotificationCenterDelegate method userNotificationCenter(_:willPresent:withCompletionHandler:) is called. By calling this method’s completionHandler you tell the system if and how it should show the Notification to the user:
func userNotificationCenter(_ center: UNUserNotificationCenter, willPresent notification: UNNotification, withCompletionHandler completionHandler: @escaping (UNNotificationPresentationOptions) -> Void) {
    // do your stuff

    // this tells the system NOT to show the notification to the user
    completionHandler()
}
If you want to show the notification you can add a set of UNNotificationPresentationOptions to the completion handler:
func userNotificationCenter(_ center: UNUserNotificationCenter, willPresent notification: UNNotification, withCompletionHandler completionHandler: @escaping (UNNotificationPresentationOptions) -> Void) {
    // do your stuff

    // this tells the system to show the notification to the user with sound
    completionHandler([.alert, .sound])
}
If you don’t want to play the notification sound while the app is running in the foreground you can simply omit the sound option:
func userNotificationCenter(_ center: UNUserNotificationCenter, willPresent notification: UNNotification, withCompletionHandler completionHandler: @escaping (UNNotificationPresentationOptions) -> Void) {
    // do your stuff

    // this tells the system to show the notification to the user without sound
    completionHandler(.alert)
}
Sometimes you offer your users the ability to make a phone call directly from your app. For example there could be a “Call Help Center” button that a user can press to make the call. When the user taps on that button the system will prompt a dialog where the user can either cancel or make the call.
When you write a UITest for this button you want to test that tapping the button will initiate the call. But you don’t actually want to make the call. So you need a way to cancel the call when the dialog shows up.
Normally you would add a UIInterruptionMonitor at the beginning of the UITest. This works for a lot of system dialogs (e.g. the dialog that asks the user for permission to use his location). But in this case it does not work. The UIInterruptionMonitor’s closure is never executed.
The reason is quite simple. UIInterruptionMonitor only works with dialogs that are presented by your app. All the permission dialogs are presented within your app’s scope, so the UIInterruptionMonitor can handle them. The phone call dialog however is presented from outside your app’s scope. You need to access the dialog via the Springboard which is now possible with Xcode 9.
You can test the help center button and dismiss dialog like this:
func testCallHelpCenterButton() {
    let app = XCUIApplication()
    let springboard = XCUIApplication(bundleIdentifier: "com.apple.springboard")

    app.launch()
    app.buttons["Call Help Center"].tap()

    // check that the dialog is presented and tap the 'Cancel' button
    let cancelButton = springboard.buttons["Cancel"]
    XCTAssert(cancelButton.exists)
    cancelButton.tap()
}